

How To Give Administrative Privileges Windows 10
 Source: Windows Cardinal
On Windows 10, you lot take two master account types for users, including Ambassador and Standard User, each one offer a different set of privileges to use a device and apps. The Administrator blazon provides complete system control, which ways that users can alter settings globally, install apps, execute elevated tasks, and perform pretty much anything.
In comparing, the Standard User account type is more restrictive. Users with the standard account can work with apps, but they can't install new applications. They can change settings, merely merely those that won't affect other accounts, which ways that global system configurations aren't allowed. If an app or a command requires elevation, they'll need administrative credentials to consummate the task.
Normally, it'southward recommended to use an account with standard privileges as it offers a more than secure environs. Yet, depending on the situation, it may be necessary to change the account blazon from Standard User to Administrator (or in reverse), and Windows 10 includes multiple ways to complete the procedure using Settings, Control Panel, User Accounts, PowerShell, and Control Prompt.
In this Windows 10 guide, we'll walk y'all through nearly every method that you lot can employ to change the account type on your device.
- How to change user account blazon using Settings
- How to alter user business relationship type using User Accounts
- How to change user account type using Command Console
- How to modify user account type using Command Prompt
- How to change user account type using PowerShell
Quick tip: If yous're looking to make your chief account standard, information technology's best to create a new ambassador account first, and and so employ the new business relationship to change your quondam business relationship to standard and make authoritative changes.
How to change user account blazon using Settings
To change the account type with Settings, utilise these steps:
- Open up Settings.
- Click on Accounts.
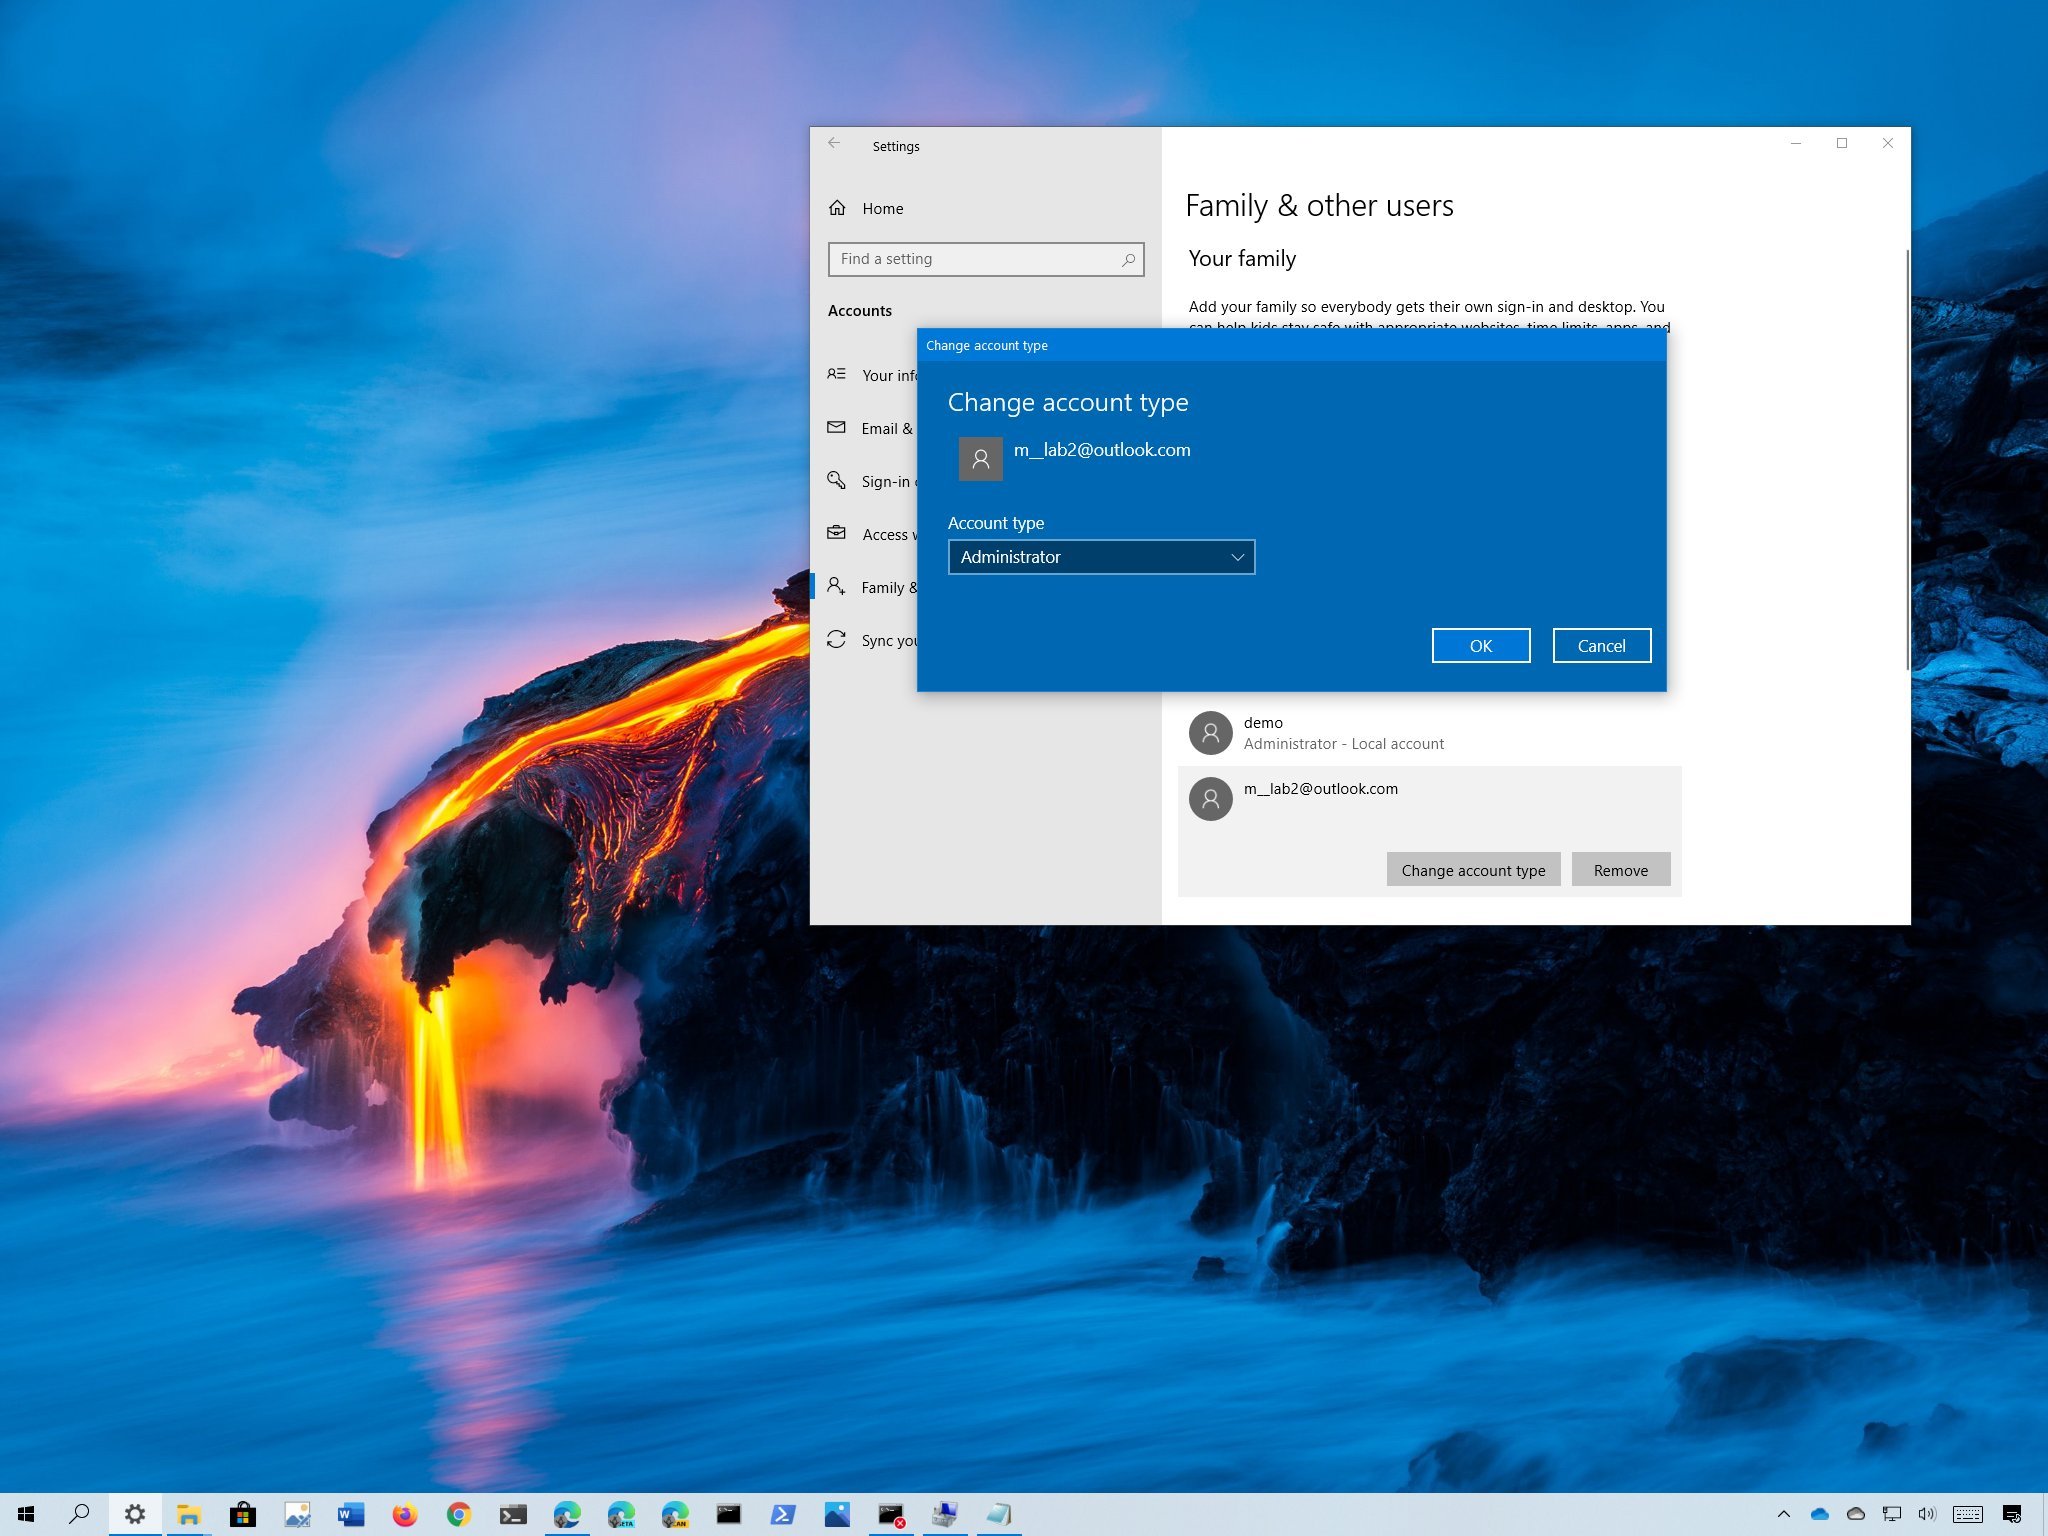
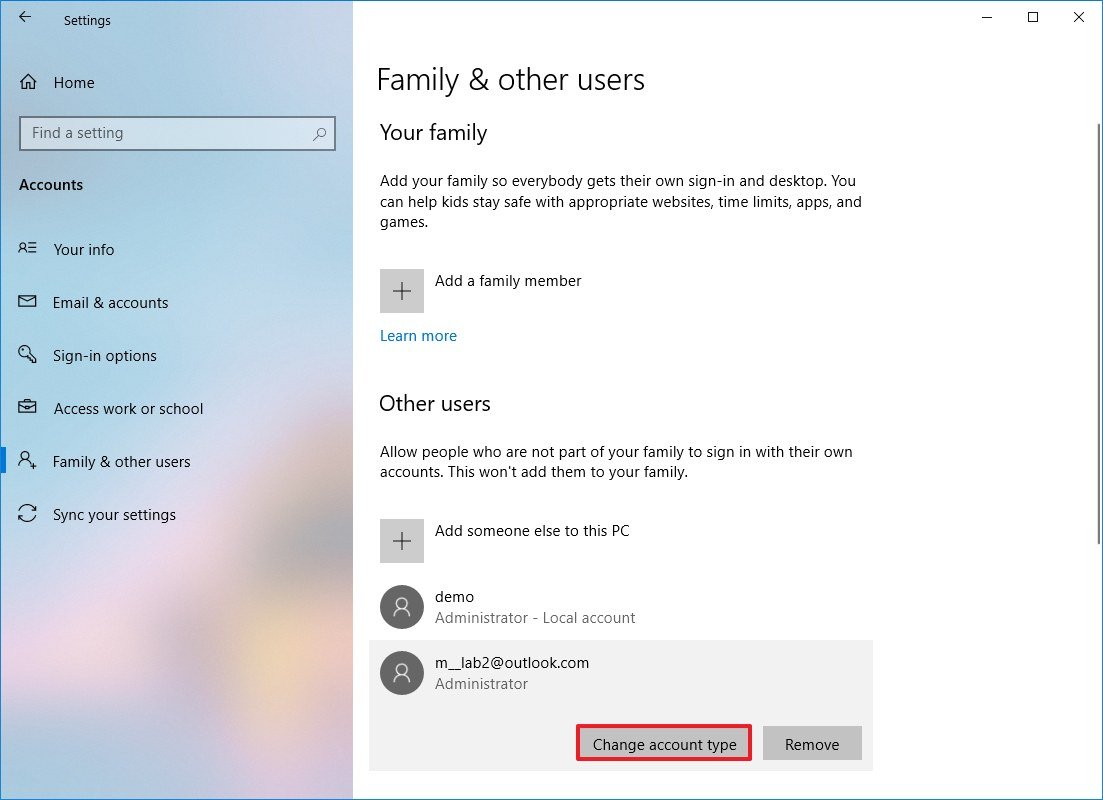
- Click on Family unit & other users.
- Under the "Your family" or "Other users" section, select the user account.
-
Click the Change account type push.
 Source: Windows Fundamental
 -
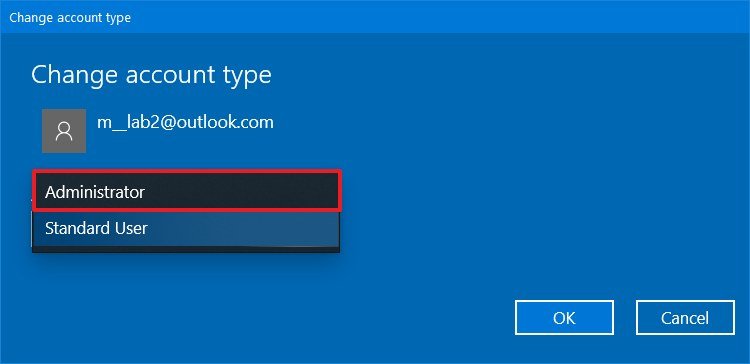
Select the Ambassador or Standard User account blazon.
 Source: Windows Key
 - Click the OK push.


Once you lot complete the steps, restart your computer to start using the account with the new privilege level.
How to change user account blazon using User Accounts
To ready an account to Standard user or Ambassador type using User Accounts (netplwiz), utilise these steps:
- Open up Start.
- Search for netplwiz and click the top result to open the "User Accounts" feel.
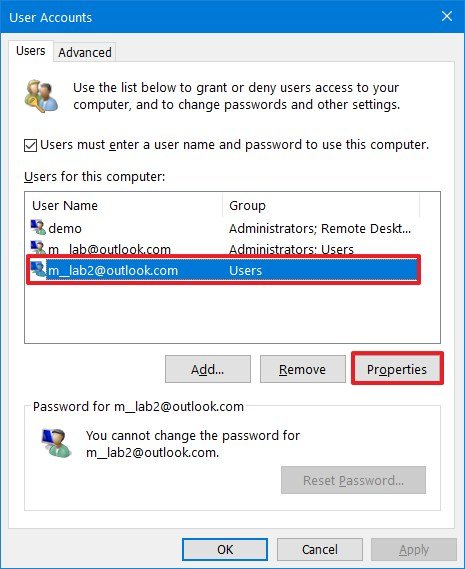
- Select the account that you wish to change.
-
Click the Backdrop button.
 Source: Windows Central
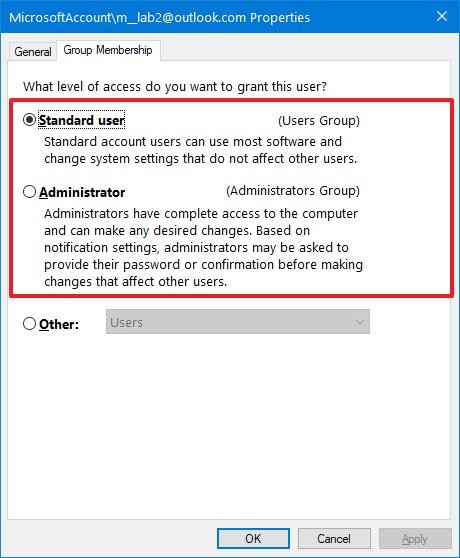
 - Click the Group Membership tab.
-
Select the Standard user or Administrator business relationship type depending on your requirements.
 Source: Windows Primal
 Quick tip: You can also select the Other membership selection, which allows you to cull different user groups, such as Ability Users, Backup Operators, Remote Desktop Users, etc.
- Click the Apply button.
- Click the OK button.
- Click the Apply button again.
- Click the OK button once again.


One time you complete the steps, restart the device to utilise the changes and start using the new account type on Windows ten.
How to change user account type using Control Console
To change an account type using Command Panel, apply these steps:
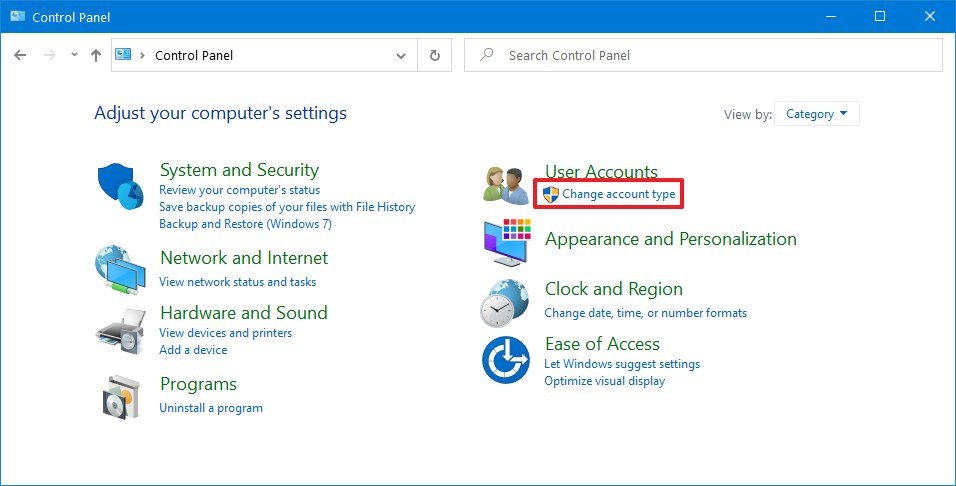
- Open Command Panel.
-
Nether the "User Accounts" section, click the Change account type pick.
 Source: Windows Cardinal
 -
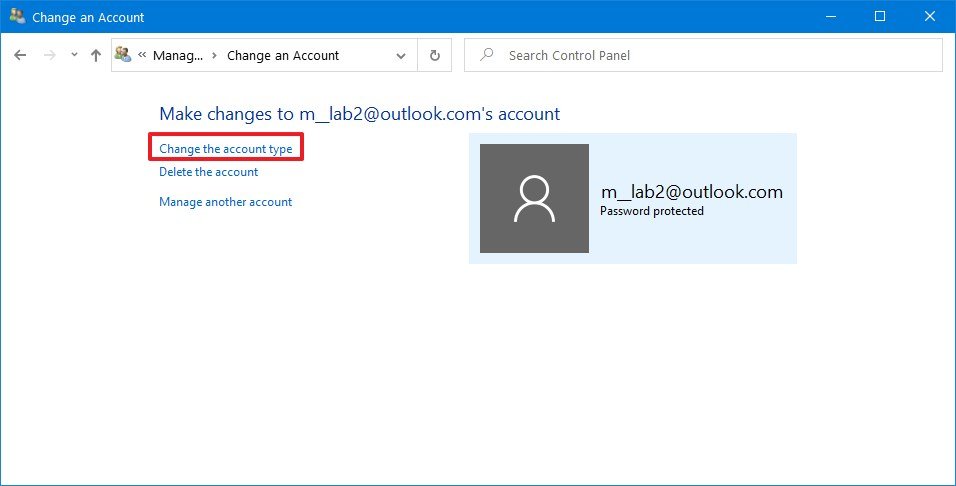
Select the account that you want to modify.
 Source: Windows Cardinal
 -
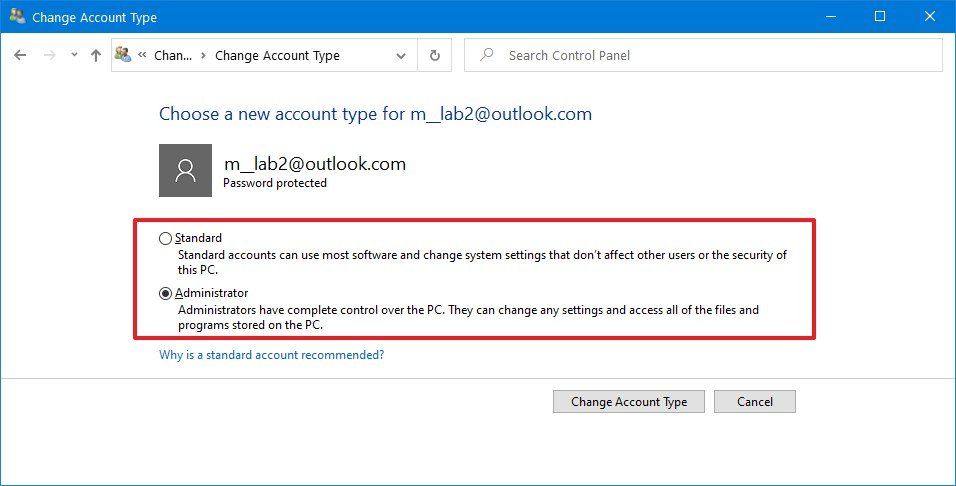
Click the Alter the account type pick.
 Source: Windows Primal
 -
Select either Standard or Administrator as required.
 Source: Windows Central
 - Click the Change Account Blazon button.


After you lot complete the steps, the next time the user signs in to the business relationship, it'll be limited to the permissions allowed by the user group that you specified.
How to change user account type using PowerShell
To change a Windows ten account type with PowerShell, employ these steps:
- Open Commencement.
- Search for PowerShell, right-click the meridian event, and select the Run as administrator option.
-
Blazon the following command to change the account type to "Standard User" and press Enter:
Remove-LocalGroupMember -Group "Administrators" -Member "Account-NAME"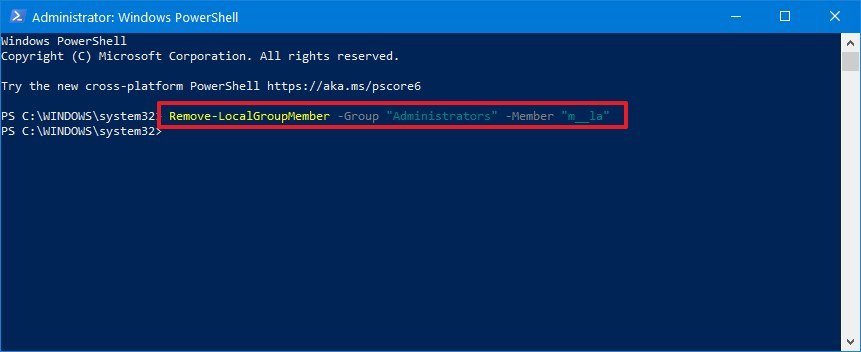 Source: Windows Key
 In the command, make sure to change the Account-Name for the bodily name of the business relationship that you want to change. If you're trying to modify an account using a Microsoft account, then the account name would exist the first v letters of the electronic mail accost.
-
Type the following command to change the account blazon to "Administrator" and printing Enter:
Add-LocalGroupMember -Grouping "Administrators" -Member "ACCOUNT-NAME" Source: Windows Central
 In the command, make sure to change the ACCOUNT-NAME for the bodily proper name of the account that yous desire to change.
Quick note: Users with administrator accounts are office of both, the "Administrators" and "Users" groups. Equally a result, to brand a user standard, you only demand to remove the user from the "Administrators" grouping.


Afterward you complete the steps, the account type will switch to the Administrator or Standard group depending on your configuration.
How to change user account type using Command Prompt
To switch account types with Command Prompt, utilize these steps:
- Open up Start.
- Search for Command Prompt, correct-click the height issue, and select the Run as administrator choice.
-
Type the post-obit control to alter the account type to Standard User and press Enter:
net localgroup Administrators "ACCOUNT-Proper name" /delete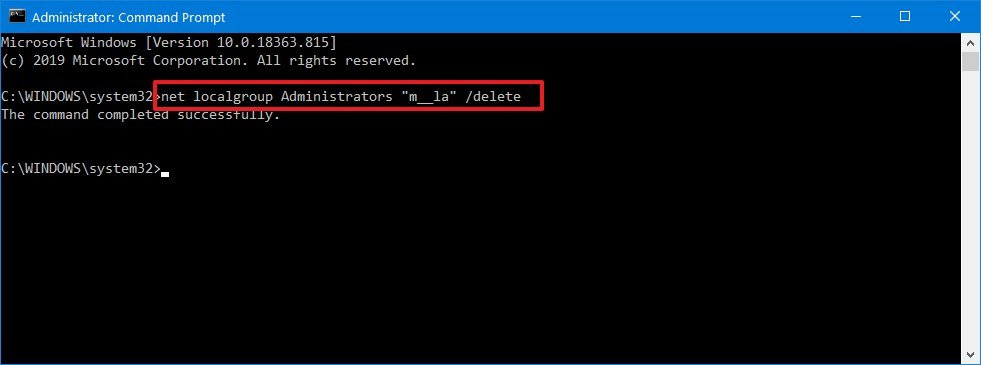 Source: Windows Central
 In the command, brand certain to modify the ACCOUNT-NAME for the actual proper name of the account that yous want to modify. If you're trying to modify an account using a Microsoft account, then the account name would be the first five messages of the email address.
-
Type the following control to change the account type to Administrator and printing Enter:
net localgroup Administrators "Account-NAME" /add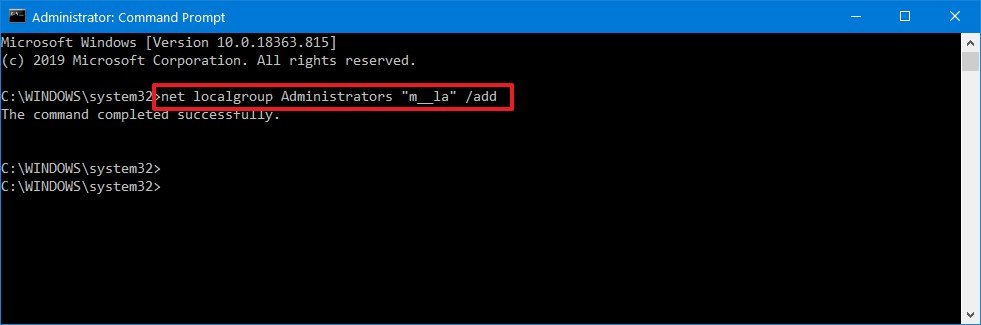 Source: Windows Central
 In the command, make sure to modify the ACCOUNT-NAME for the bodily name of the account that you lot want to alter.
-
Type the following command view the account type and press Enter:
net user ACCOUNT-Proper name Source: Windows Primal


Once you complete the steps, the next fourth dimension the user signs in to the device, the business relationship will load with the privileges allowed past the group that yous specified in the command.
More Windows x resources
For more than helpful manufactures, coverage, and answers to common questions about Windows ten, visit the following resources:
- Windows 10 on Windows Central – All you need to know
- Windows 10 assistance, tips, and tricks
- Windows 10 forums on Windows Central

Ranking the large bads
Ranking all 15 of Elden Band's chief boss fights
Elden Ring has xv different main boss battles, but which ones are the all-time (and which ones are terrible)? Here's our definitive ranking of each and every primary boss in the game.

FRESH LORE
Ancient Windows 1.0 Easter egg unearthed, features Gabe Newell
Just when you lot thought the lore vaults of ye olde Windows one.0 had been exhausted, a new entry appears. And it gets even more exciting: This detail asset of knowledge contains a reference to none other than Valve's very own Gabe Newell.

How To Give Administrative Privileges Windows 10,
Source: https://www.windowscentral.com/how-change-user-account-type-windows-10
Posted by: fosterager1944.blogspot.com
0 Response to "How To Give Administrative Privileges Windows 10"
Post a Comment